HVS Animator User Manual
 [ Contents |
Digital Frontiers ]
A Quick Guide for Manual-Haters
The following sections will quickly get you started in creating and editing GIF animations.

Creating a New GIF Animation
- Create your frames as single-image GIFs using HVS ColorGIF 2.0 or another tool. They should share a common palette - you can do this with HVS ColorGIF's MultiPalette feature. You can also import frames from another animation, but the palettes should match.
- Start HVS Animator or click on the "Close" button.
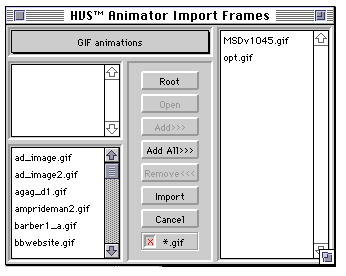
- Click on the "Import..." button.
- There will be a pause as the Import Dialog scans the files on your hard drive. If you want to see only valid GIF files, select the "*.gif" checkbox. (NOTE: this could cause the file scan to take significantly longer).
- After the dialog is up, use the choice box at the top to select the directory in which your frames (single or multi-image GIFs) are stored. You should see your frames listed in the list box at the bottom left.
- HVS Animator automatically sorts the files in alphabetical order. This makes it easy to maintain the order of your frames by naming them in a sequence, such as FRAME001.GIF, FRAME002.GIF, etc.
- For each frame you want to import, click on it and select "Add". Or, you can select "Add All" and all the frames in the selected directory will be added in alphabetical order.
- When all the frames are in the add list box at the right, click on the Import button, and they will be imported into the HVS Animator main editing window.
- The first frame's palette will become the global palette for the animation. All frames should be created using the same palette, or color problems and blinking could occur when the animation is displayed.
- You can change frame order by clicking in the frame's move box ("<->") and dragging left or right.
- Turn on Optimize checkbox (only available in Animator Pro) in the main window.
- If you wish to reduce the number of colors in the global palette, select the desired number of colors and click on the Reduce button. Use Auto Reduce to automatically generate a number of recommended reductions, enabling you to make quality/size tradeoffs quickly and easily.
- Click on a Save button to save one of the new animations to your hard disk. It is helpful to have separate directories for your input frames and saved animations.

Optimizing an Existing GIF Animation
- HVS Animator Pro excels at saving space and download time by applying a number of optimization techniques to existing GIF animations. Optimization features are only available in HVS Animator Pro - to order/upgrade call 847-328-0880 or visit http://www.digfrontiers.com.
- Find an existing GIF animation on your hard drive. If you don't have any, use your browser to download a banner from the Web (in Netscape, while the animation is playing right-click (Windows) or hold the button down (Mac) and select "Save Image As...").
- Click on the Open... button and open the GIF. You should see its frames displayed in the HVS Animator main window and Preview. While opening, HVS Animator Pro will analyze your image to determine the lowest recommended color count (displayed as "Min colors:" in the main window).
- The original unoptimized size of the animation in bytes will be displayed in the Preview info panel (e.g., "Orig: 24575").

- Turn on Optimize checkbox (only available in Animator Pro) in the main window.
- Click on the Auto Reduce button. HVS Animator will reduce the palette to a number of different levels and show the resulting quality for each.
- Select the image that looks good but is the smallest. Image size will go down as number of colors decreases.

Mouse and Keyboard Editing Shortcuts
- Fast edit for parameter values (Delay, Left, Top, Dither, Colors) - click on value and hold button down while dragging the mouse up or down.
- Use the "+" and "-" keys to increment or decrement the value by one.
- Use the arrow keys to move the focus to a different parameter.
- To enter numbers just type a digit or double-click on the parameter box and it will operate like a normal edit control.
Macintosh Drag-and-Drop Features
- To open an existing GIF file: with HVS Animator not running, drag a GIF file onto the HVS Animator application icon.
- To import a single-image GIF or all frames of an animation at the current insertion point: with HVS Animator running, drag the file onto the application icon.

Last Updated: 3-Dec-97


